Followers

Sunday, February 27, 2011

Penny Black Easter

Happy Sunday! I just got home from church and finished this delightful  Penny Black
easter card. I used Stampin' Up cardstock and a piece of vellum from my long time stash.
I love Easter and what it represents, the renewing of ourselves in God. I always associate pastels with Easter and spring as well, so I went with this soft tone. The image was die cut with Spellbinders "Label Eight".
And I used a digital sentiment from Digital Delights Stamps by Louby Loo and placed it over die cut rods from Spellbinders "Charms and Rod" Die.
Pearls and roses, I tinted with Distress ink, were added to keep a girlie feel to the card.


I am entering this little cutie into the following Challenges...

         Penny Black Easter
         Sentimental Sunday #44 Mar 4
         Did It Creations #43 Punches/Diecuts Mar 5
        Craft Your Passion Mar 6
        Stamptacular Sunday #100 "You've Been Framed" Mar 5
        Crazy 4 Challenges #76 "Flowers" Mar4
        BunnyZoe Crafts #9 "Flowers" Mar 13
       Stampin B's #99 "Flowers" Mar 3                  
       Simply Create #38 "Power of Flowers" Mar 11
        Incy Wincy #83 "Spring is in the Air" Mar 6
        Whoopsi Daisy "Let's Get All Cute" Mar 5


I hope you are having a wonderfully blessed day and are enjoying your obsession, hoarding, I mean crafting....:)  God Bless and Hugs to you...
                      Debby.

Wednesday, February 23, 2011

Hope "Springs" Eternal

Hello....welcome to my world, or a small part of it anyway...lol.  I have created a spring themed card today using Sweet Sunday Sketch #105 and a hyacynth digi from "Delicious Doodle", that had I purchased at Stitchy Bear Stamps store.I love their artists! I used Bazzill cardstock; which I cut into six pieces each, embossing  the white with Cuddlebug folder "Textiles" (one of my favorites BTW).  I placed them on a lavender side opening card,  I had cut with my Fickars trimmer and scored with my Scor-Buddy.

I  colored the digi with Derwent colored pencils and baby oil. And because it represents spring, I used Glossy Accents to randomly create dew drops on the leaves and petals. Glossy Accents is great to create dimension too. I then diecut the image with my Spellbinders classic circles and backed it with a scalloped circle in violet, also cut with Spellbinders scallop circles.


I cut a half inch strip from the violet cardstock and punched the edge of one with a Fiskars edge punch. Fiskars has a terrific selection of edge punches, (I think I own them all...opps did I say that outloud?!? LOL).
I then cut a slightly wider strip and punched one edge with the Martha Stewart "Spring" punch.
They were both mounted horizonally across the card, and the focal image, pop dotted and placed off center on the right.


I added a few dew drops (I purchased on ebay) under the word "spring" with glossy accents as my glue (unfortunately the glossy accents created a little mess around one of them [ I have to blame something, It sure can't be my fault can it?  ;))  ] And then placed another dew drop to the right of the focal point for balance. Lease note I intentionally did not carry the top strip all the way to the right, to make it visually interesting.
All in all I was satisfied with the "clean"(chuckle, chuckle) results (CAS that is).

I am entering this card in the following challenges...

Sweet Sunday Sketch #105 Feb 25  I WON!!!
Tuesday Throwdown  Feb 28  Yeah Aletha Jane!
I Did It Creations #43 "ANYthing Goes  Yeah Feb 26 Yeah Kym !
One Stitch in Time #50 Feb 26   Yeah  Lisa Jane !


Thank you so very much for stopping by, I love reading your comments, so be sure to say "hello" when you drop in. Have a truly special day today. God love you!
Debby                                                                                                                         

Monday, February 21, 2011

Send in the Clowns

I needed something to put a book in for a gift and decided to recycle a Granola box. I undid the seams and using the flatten box as a templete, traced around it adding  two extra inches all the way around, and then cut the paper out.
Using red tape on each of the side flaps for strength, I attached the paper to the box (I wanted minimal wrinkling so I decided the less adhesive on the box the better)  And
 again using the red tape on the side flaps, I reassembled  it..

Using Sew Many Cards Sketch #44 I knew I wanted a strong image with minimal embellishments, so I chose a digital stamp I got free [As soon as I remember what site I got it off of I will post the Artist's name] and printed it on Bazzill cardstock. I used Copics and Derwent colored pencils to color the image. I then die
cut the stamped clown with Spellbinder label #10, embossed it, cut the lip off and backed it with Gold mirror cardstock. [I used the same size die for the mirroring].
 I added red rhinestones to his pompoms, though they are hard to see.
I matted the piece with tourquoise cardstock, then gold. mirroring.  I did the same thing with "Celebrate", which had been created in Microsoft Word.
 I used  Spellbinder Petite Small Oval to die cut it and it too
 is backed with gold mirored cardstock. I then pop-dotted it in the right corner.


I punched red cardstock with Martha Stewart "Morroco" edge punch and tucked it into the gift box, making it removable in case I wanted a different color. If I was going to adhere it I would have done it while the box was still flat.

I knew the handle needed to be strong so I just cut  various colored cardstock into graduated widths, inked the edges (in contrasting colors, blue with yellow, pink with purple, etc). I stacked one on top of the other. I then clued one narrow end together first, curved them and then clued the other end, which prevented it from buckleing.  I punched a small hole in both the boxes' sides and the handle ends, attaching the handle with a large brass brad( approx 1") at both ends, respectively. The brads are made by Paper Studio.

I have another pic but for some reason my computer is freezing up when I try to import them, grrrrrrr.....LOL.


Yeah I did it!, my computer started working again! This is the top view of the handle, strong enough to hold the weight of a book.


This gift box is for the following challenges...
                                             Sew Many Cards Sketch #44 Feb 24
                                              C.R.A.F.T. ChaLLENGE #90 Feb 23
                                                   One Stitch in Time Feb 25
                                            Papertake Putting on the Glitz Feb 21

Thank you so much for stopping by and hope you enjoyed yourself. Have a fabulous day tomorrow!
Debby

Saturday, February 19, 2011

Hi everyone. I know I have been silent most of the week...my youngest son is in town with my youngest grandaughter, whom I have never met. So I have been busy. See you soon!

Monday, February 14, 2011

Husband's Love


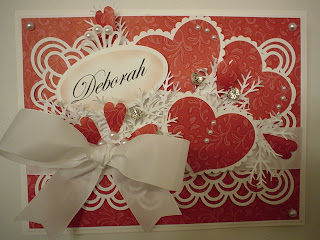
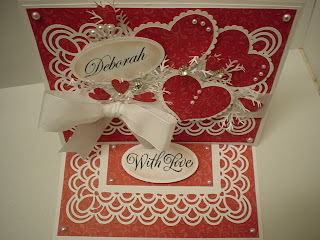
No & No....This is NOT the card in my header...AND this is NOT from my husband (I had to divest myself of him quite awhile back...LOL)....This card is for one of my sons to give to his wife "Deborah".  He saw the card in my header and really like it and asked me to make another, but to create it as an easel card.
So I chose a DP from Making Memories called "Heritage" and the cardstock is from Bazzill. I punched (2) 6"x4" white pieces of cardstock with the Martha Stewart " Double Arch "around the page punch.

The large hearts are punched from my favorite punch by Family Treasures ( I have used it several times lately...teehee),  and the other punches I used are...small heart from Carl,and  the branches are from McGill (it looks similar to the one Martha Stewart came out with after McGill did).

The "Deborah" salutation I made on the computer using "Edwardian Script", and the "With Love" is a  Rubber Stampede stamp. I also embellished with  pearls from Hobby Lobby's Bridal Dept (they go half off alot) and ribbon from Michael's.

I inked the edges of both ovals with "tattered rose" Distress ink by Tim Holtz, before removing it  from the Small Petite oval Spellbinders. I then made a larger version of  "Deborah",  embellished with with Martha Stewart's Deco Fan punch and more pearls. and attached it to the front of the envelope. My son loved it. He is taking my lovely daughter-in-law to a couple's massage today and then lunch. 

This card is for the following challenges...

Thursday, February 10, 2011

Purple Passion


Hello everyone. How is everybody in Blogland today? Grand I hope! Purple is my favorite color and this card came together rather quickly. I used some Creative Imagination DP with Bazzill cardstock.
I added a Way2Scrap glitzy flourish, some purple buttons and lavender rhinestones from my stash. The butterfly and feather elements were inked and pop dotted.


I have been itching to make a purple flower. You will notice it has multiple colors; I inked the some edges with purple and others with yellow. I think it turned out looking like a wild rose ,maybe? I am very happy
with the way it turned out
 
I then punched out the word "dream" from the DP with a Stampin' Up word punch, inked the edges with purple and adhered with pop dots


I am entering the following Challenges...

Craft Your Passion #44  "Anything Goes"   http://craftyourpassionchallenges.blogspot.com/2011/02/challenge-44-sponsored-by-stamping.html

Flourish Timeless Tuesday #104  "Button Up!"  http://www.flourishes.org/2011/02/3312/

Top Tip Tuesday #21 "Frame It"    http://toptiptuesday.blogspot.com/2011/02/top-tip-21-outside-frame-tutorial-frame.html

Flourishes "Winter Thaw"   http://www.flourishes.org/2011/02/are-you-ready-for-a-taste-of-spring/

 Squigglefly "Making the Rounds"   http://squigglefly.blogspot.com/2011/02/squigglefly-challenge-84-sfc84-making.html

Sew Many Cards "Anything Goes"  http://sewmanychallenges.blogspot.com/2011/02/challenge-42-anything-goes.html

Joan's Gardens "4  
http://joanscreations.blogspot.com/2011/02/card-challenge-7.html

Forgotten Scraps "Anything Goes"   http://forgottenscraps.blogspot.com/2011/02/challenge-2-anything-goes.html

Thank you so much for coming by. I sure hope you like the card and send some friends over to take a glimpse at it. Have a super day and Happy Crafting!
 Debby

Sunday, February 6, 2011

Vintage Wishes


Hello again...I have a second card for you today and  I am Very happy with the way it turned out.  I used a vintage paper, and made a couple of green flowers, which is unconventional,I know, but I wanted them as my focal point, so I did not think it would matter that they were green...LOL.

I used a Spellbinder label die to cut out a light pink Bazzill cardstock for the background of focal point, then de-embossed, inked and matted it with a green Bazzill cardstock.

I used a $1 stamp for the "Happy Birthday" sentiment, punched it out with a Stampin' Up punch, inked the edges, attached another punched "motif" piece and mounted an inked premade flower.


I added addtional premade flower, and inked them as well with a deeper pink.


Each of the corners has a Flourish, cut out with my Cuttlebug, and embellised with pearls. All of the pearls were white, so I inked them with Distress ink to make them pink.


I really had fun making this card and hope you enjoy it. Thanks for stopping by and have an incredible week.!

Debby

Entering the following Challenges...

Simple Friendship

Happy Sunday! It is a beautiful white day outside...snow as far as the eyes can see, and then some...LOL
There is a new Blog called " Less is More" and the  DTs have started Week 1 with A "Black, White and Pink" Color Challenge .here
We were to create a CAS card and here is what I came up with...


This is also for the following Challenges...


Thanks for stopping by...
Debby

Friday, February 4, 2011

Dreams Take Flight

Hello...I am late at posting this creation so just a quick note. I used Stampin Up! Cardstock and ink, An Inkadinkado stamp, Cuttlebug Swiss Dot Embossing folder, border punch, and some glitter and pearls. I also made the Flower and Beaded embellishments. I love these colors, hope you do to. The glitter glue made it wrinkle a bit, opps!


.This is for the following Challenges...

Sweet Sunday Sketch #102   http://kgiron.blogspot.com/2011/01/sweet-sunday-sketch-challenge-102.html

Stamptacular Sunday challenge #96   "Whateva"
http://stamptacularsundaychallenge.blogspot.com/

Stamp. Fairy #8 Handmade Flowers   http://stampfairychallenge.blogspot.com/2011/01/challenge-8-homemade-flowers.html

Papertake Anything Goes + Flowers  
http://papertakeweekly.blogspot.com/
Thanks for stopping by and have a Wonderful Weekend!
Debby

Wednesday, February 2, 2011

Blooming Valentine

Good evening everybody. Well we got our 14 inches of snow; everyone's kids loved it, I am sure. No School!!

I have made a simple Valentine using Bazzill cardstock(it is a pretty soft blue, but shows up more like a grey instead, in the pic). I  used a DP from my stash, Martha Stewart corner punch, Derwent color pencils with baby oil, Spellbinder Label die cut, heart punches [I love the heart with scallops, can you tell, I have used it quite abit lately], and added some rhintestones for some bling.


This was made for the following Challenges...

Simply Create   http://simply-create-alford.blogspot.com/2011/01/new-challenge.html

Top Tip Tuesday #20 "Anything Girly"  http://toptiptuesday.blogspot.com/2011/02/top-tip-20-ribbon-banner-girlie.html


Thanks so much for looking , have a terrific evening, and God Bless!
Debby